Bundle Builder
What is the Bundle Builder section?
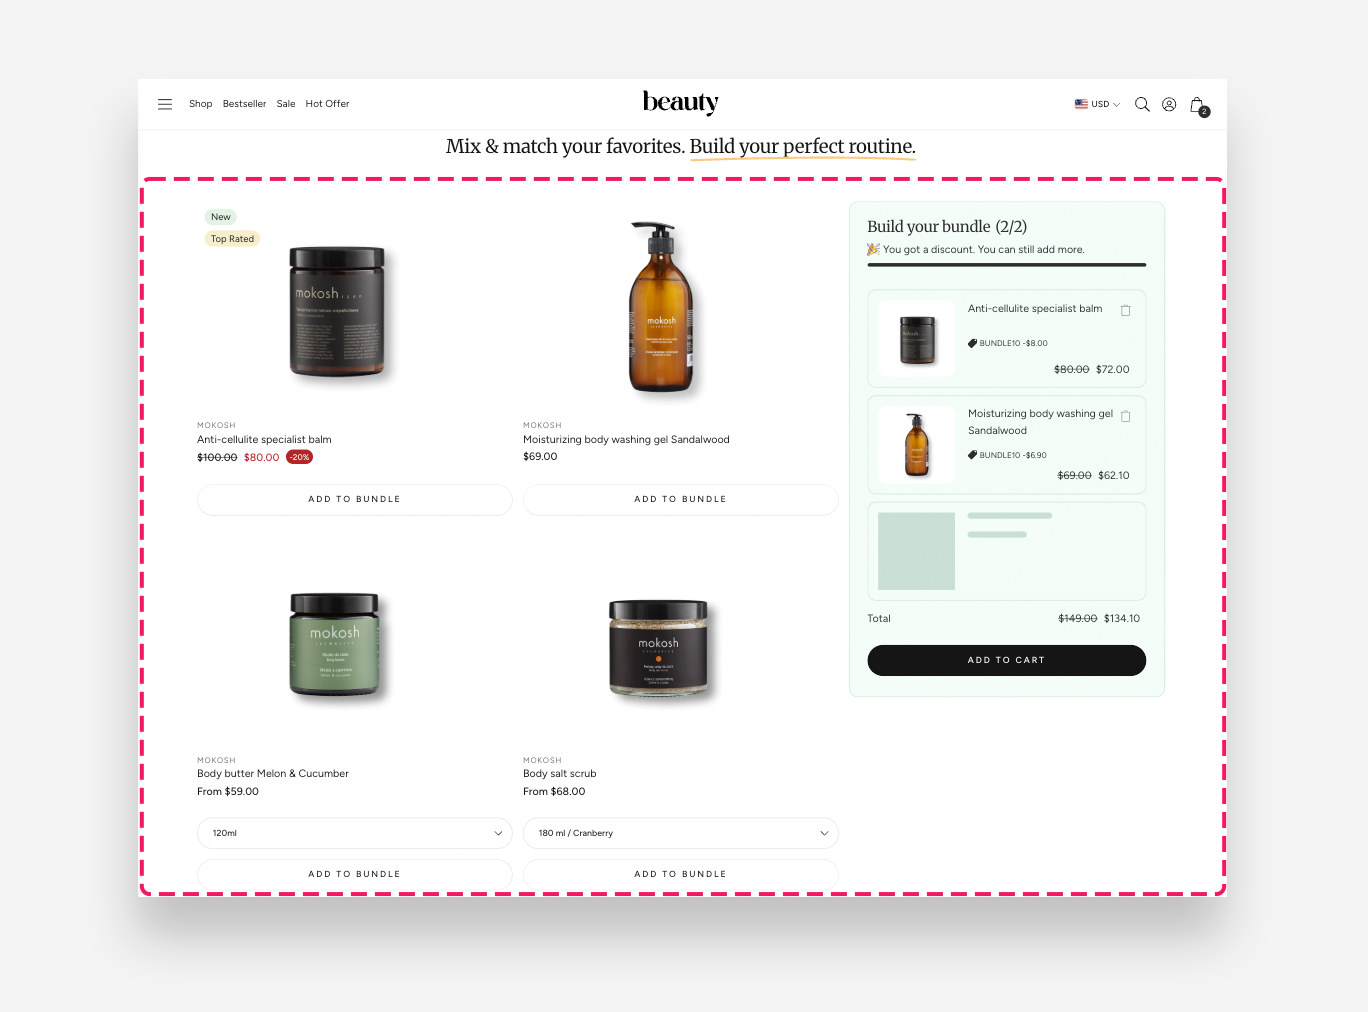
The Bundle Builder section lets customers create their own bundle from a grid of products and get a discount for buying several together. Customers pick items, watch a running total (with the bundle discount previewed live), and add the whole set to their cart in one click. It's a great way to increase average order value and encourage customers to discover more of your range.
The section is built from two parts that always work together: a Products grid customers choose from, and a Panel that holds their bundle, shows the total and discount, and contains the "Add to cart" button.
The discount shown inside the bundle is a preview. For customers to actually pay the discounted price, you need to create a matching discount in your Shopify admin and enter its code in the section — see Before you start below.
Before you start
To make the bundle discount real (not just a preview), set up a discount in Shopify first:
- In your Shopify admin, go to Discounts and click Create discount.
- Choose Amount off products and set it up to match the bundle — for example, a percentage or fixed amount off the products you'll offer in the builder.
- Choose a discount code (rather than an automatic discount) and copy it.
- You'll paste this code into the section's Discount code field, and set the same Discount type and value, so the preview matches what customers are charged at checkout.
How to set up the discount
The discount preview in the section is just a display — the real saving comes entirely from the Shopify discount code. If the code is missing, misspelled, or doesn't apply at checkout, the crossed-out prices are cosmetic only and customers will be charged full price. To make sure the preview matches what customers actually pay, keep these Shopify rules in mind:
- The code must be active. A discount that is scheduled for the future, expired, deactivated, or has hit its usage limit won't apply, even if the code is entered correctly. Also watch one-per-customer and total usage limits — a returning customer may find the code no longer works.
- The discount must cover the bundled products. "Amount off products" only discounts the specific products or collections you scope it to. If the builder includes products the discount doesn't cover, those items won't be reduced at checkout and the total won't match the preview. Keep the discount's product scope in sync with the collection/products in the Products block.
- Fixed amount behaves per item in Shopify. An "Amount off products" discount set to a fixed amount is taken off each eligible product, not off the bundle total. The section's Discount fixed amount preview may not line up with this — a Percentage discount usually matches more reliably.
- Minimum requirements can block the code. If the Shopify discount has a minimum purchase amount or quantity, make sure it's compatible with your Minimum products bundle rule, or the code may be rejected at checkout.
- Check discount combinations. Shopify decides whether this code can stack with other product, order, or shipping discounts. If combinations are off, the bundle discount and any automatic or cart-level discounts may not apply together — only one will win.
- The discount isn't tied to the bundle — it follows the products. Because this is an ordinary Shopify "Amount off products" code, it applies to the scoped products wherever they are in the cart, not only when added through the Bundle Builder. If a customer adds the same products from their product page (PDP) and the code ends up on the cart, Shopify will still discount them — the bundle builder isn't required for the code to work.
How to add the Bundle Builder section
- In your Shopify admin, go to Online Store > Themes.
- Click Customize on the theme you want to edit.
- Choose the page (or template) where the bundle should appear, then click Add section and select Bundle Builder.
- The section comes with its two blocks — Products and Panel — already in place. Click each one to edit its settings. (These blocks are built in, so you don't add or remove them yourself.)
- Under the section's Products block, choose the collection or products customers can bundle.
- Set your Bundle rules and Discount in the section settings.
- Click Save.
Main settings
These settings apply to the whole bundle.
General
- Heading — the title shown above the bundle builder.
- Make section full width — let the section stretch edge to edge instead of sitting within the page margins.
Bundle rules
- Minimum products — how many items a customer must add before they can check out and before the discount kicks in (1–8, default 2).
- Maximum products — the most items a customer can add to one bundle (2–8, default 3). Once this is reached, the "Add to bundle" buttons switch off until they remove something.
Discount
- Discount code — the code of the Shopify discount you set up in Before you start. The theme applies this code automatically when the customer adds the bundle to their cart.
- Discount type — Percentage or Fixed amount. Match this to your Shopify discount.
- Discount percentage — the percentage to preview when the type is "Percentage" (default 10%).
- Discount fixed amount — the amount to preview when the type is "Fixed amount".
Colors
- Text color and Background color — set the overall look of the section.
Section spacing
- Distance from the top and Distance from the bottom — adjust the space above and below the section (default 20px each).
- Enable mobile spacing — turn this on to set different top and bottom spacing on mobile.
Blocks
The Bundle Builder always contains the two blocks below. They're part of the section by design — you edit them, but you don't add, remove, or reorder them.
Products block
The grid of products customers choose from. Each card has an "Add to bundle" button (and a variant dropdown when the product has options).
Products
- Collection — the collection customers can build their bundle from.
- Products — or hand-pick a specific list of products. If you set a product list, it's used instead of the collection.
- Maximum products to show — how many products appear in the grid (3–24, default 4).
- Hide sold out products — leave sold-out products out of the grid entirely.
Desktop version
- Number of columns — how many products sit side by side on desktop (2–4, default 2).
- Spacing — the gap between products on desktop: 8px, 16px, or 24px.
Mobile version
- Number of columns — how many products sit side by side on mobile (1–3, default 2).
- Spacing — the gap between products on mobile: 4px, 8px, 12px, or 16px.
Product card
- Text alignment — Center or Left.
- Image ratio — the image shape: Adapt to image, Portrait, or Square.
- Show product media video — play a Shopify-hosted product video (only for products that have one).
- Show second image on hover — reveal a second image when customers hover over a card.
- Show vendor — display the product's vendor name (on by default).
- Enable vendor link — make that vendor name clickable. (Only shown when "Show vendor" is on.)
- Show product rating — display the product's rating, on by default (requires a product rating app).
- Button style — how the "Add to bundle" button looks: Primary or Secondary.
Panel block
The customer's bundle tray. It lists the items they've added, shows the running total and discount preview, and holds the "Add to cart" button. On mobile it appears as a panel the customer can open and close.
General
- Heading — the panel's title (default "Build your bundle"). A live count of chosen items, like "(1/2)", appears next to it.
- Heading size / Heading size (mobile) — scale the heading up or down on each screen size.
- Text — a short line below the heading, ideal for explaining the offer (default "Buy min. 2 products and save 10%").
- Enable progress bar — show a bar that fills as the customer moves toward the minimum number of products (on by default).
- Button style — how the "Add to cart" button looks: Primary or Secondary.
- Footer text — optional text shown at the bottom of the panel, for example terms or delivery notes.
- Alignment — align the panel's heading and text Left or Center.
Colors
- Text color and Background color — the look of the panel.
- Panel background opacity — how see-through the panel background is. (Only applies on mobile.)
- Panel background blur — blur what's behind the panel. (Only applies on mobile.)
- Border color — the color of the panel's border.
- Placeholder color — the color of the empty slots shown before items are added.
How it works
Building a bundle
- The customer browses the Products grid and clicks Add to bundle on the items they want. Products with options (like size or color) have a dropdown to pick a variant first.
- Each item drops into a slot in the Panel, which shows its image, chosen options, and price.
- The panel keeps a running total, and a small counter (for example, "(1/2)") shows how close the customer is to the minimum.
- Customers can remove an item at any time using the bin icon on its slot.
The minimum and maximum
- The Add to cart button stays switched off until the customer reaches your Minimum products. Until then, the panel encourages them to keep adding.
- Once the Maximum products is reached, the "Add to bundle" buttons switch off so the customer can't exceed the limit. Removing an item switches them back on.
The discount preview
Once the customer hits the minimum number of products, the panel shows the saving: original prices are crossed out, the discounted total appears, and a "🎉 You got a discount" message shows (plus "You can still add more" if there's room for more items). This preview uses your Discount type and value.
The actual discount is applied at checkout using the Discount code you entered — the theme adds that code to the cart automatically when the customer clicks Add to cart. This is why the code, type, and value here need to match the discount you created in your Shopify admin.
Adding to cart
When the customer clicks Add to cart, all the bundled items are added to the cart together, the discount code is applied, and the cart drawer opens. The bundle then resets so they can start a new one.
Remembering the bundle
If a customer leaves and comes back to the page, their in-progress bundle is still there — the theme remembers it in their browser until they check out or remove the items.