Feature icons block
Since v1.0.0Product page
The Feature Icons block displays a row of icons with labels on the product page, ideal for highlighting key product attributes such as certifications, materials, or values — for example Cruelty-free, Gluten-free, Recyclable, or Vegan. Icons can be added manually or sourced from a metafield.
![]()
Settings
- Layout: Choose how the icons are arranged — Column, Row-Left, or Row-Center.
- Show icons label: Enable this toggle to display the text label beneath each icon.
Icon with Text 1–4
Each of the four icon slots has the following settings:
- Select icon: Choose a built-in icon to display.
- Icon: Upload a custom icon image to display instead of the built-in icon.
- Text: Enter the label displayed beneath the icon.
Icons from Metafield
- Metafield: Enter the namespace and key of the metafield holding the list of feature icons, using the format
namespace.key— for examplecustom.feature_icons.
Large Screen Version
- Items per row: Set the number of icons displayed per row on desktop. Affects only the Row-Center layout.
- Icon size: Set the size of the icons on desktop.
- Text scale large screen: Adjust the font size of the icon labels on large screens.
- Show advanced settings: Enable this toggle to reveal additional spacing and sizing controls.
- Gap between icons: Set the spacing between individual icons on desktop. A value of 0 uses the default spacing.
- Icon container width: Set the width of each icon container on desktop. A value of 0 uses the default width.
- Icon label margin top: Set the top margin between the icon and its label on desktop.
- Icon label margin bottom: Set the bottom margin below the icon label on desktop.
Mobile Version
- Items per row: Set the number of icons displayed per row on mobile. Affects only the Row-Center layout.
- Icon size: Set the size of the icons on mobile devices.
- Text scale mobile screen: Adjust the font size of the icon labels on mobile devices.
- Show advanced settings: Enable this toggle to reveal additional spacing and sizing controls for mobile.
- Gap between icons: Set the spacing between individual icons on mobile. A value of 0 uses the default spacing.
- Icon container width: Set the width of each icon container on mobile. A value of 0 uses the default width.
- Icon label margin top: Set the top margin between the icon and its label on mobile.
- Icon label margin bottom: Set the bottom margin below the icon label on mobile.
How to Create a Metafield for the Feature Icons Block
Follow these steps to properly set up a metafield for the Feature Icons block:
1. Create a Metaobject for Feature Icons
- In the Shopify Admin, go to Settings → Metafields and metaobjects → Metaobjects.
- Name it (e.g., Product Feature Icon ).
- Add the following fields:
- Single line text – Name it Label (stores the feature name).
- File – Name it Image (stores the icon). Under Accept specific file types, select Images only
![]()
2. Add Entries for Feature Icons
- Go to Content → Metaobjects , select the metaobject created in Step 1.
- Click Add entry .
- Enter a Label and upload an Image for each feature icon.
- Repeat for all feature icons needed.
![]()
3. Create a Metafield for Feature Icons
- In the Shopify Admin, go to Settings → Metafields and metaobjects → Products Add definition.
- Name it (e.g., Feature Icons ).
- Select Metaobject as the type and reference the metaobject created earlier ( Product Feature Icon ).
- Enable List of entries .
- Click Save .
![]()
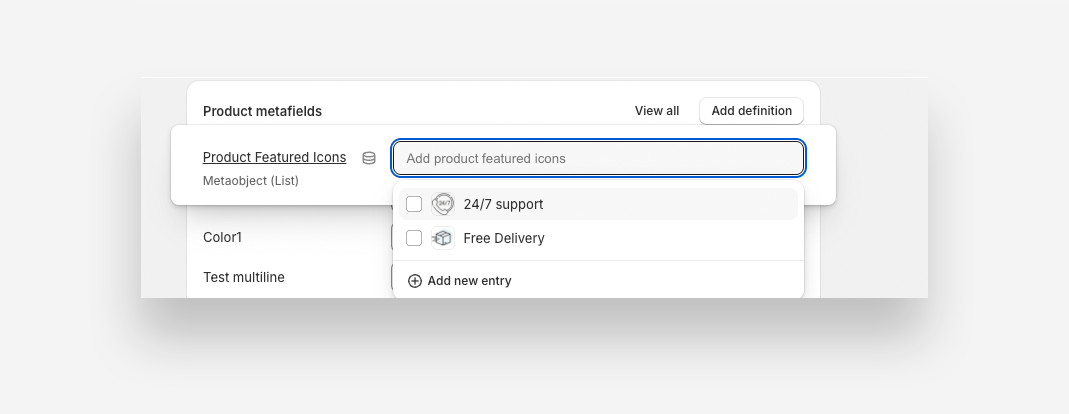
4. Assign Metafield Values to a Product
- Open the Products section in Shopify.
- Select the product you want to customize.
- Scroll to the Metafields section and choose the metafield you just created.
- Add the items (features) you want to display.
- Click Save .
5. Add the Feature Icons Block in the Theme Editor
- Open Online Store → Customize .
- Select the Product template.
- In the Product Information section, click Add block and choose Feature Icons .
- In the Metafield setting , enter the namespace and key (e.g., custom.feature_icons).
6. Save and Apply
- Adjust block settings as needed.
- Click Save and preview the product page to ensure proper display.