Product Siblings (Product Variations)
The Product Variations Block lets you display linked product siblings — such as different colors or styles — directly on the product page, so customers can easily switch between them.
There are three ways to configure this, depending on how you want to manage swatch visuals:
- Using product images with a category metaobject list — the simplest setup with the least configuration: reuse the Color metaobject Shopify shows after you set a product category, and use the featured image as the swatch
- Using metafields with custom swatches (images) — assign a dedicated color or image to each product via a metafield
- Using product images — use each product's existing featured image as the swatch with a text label
Example
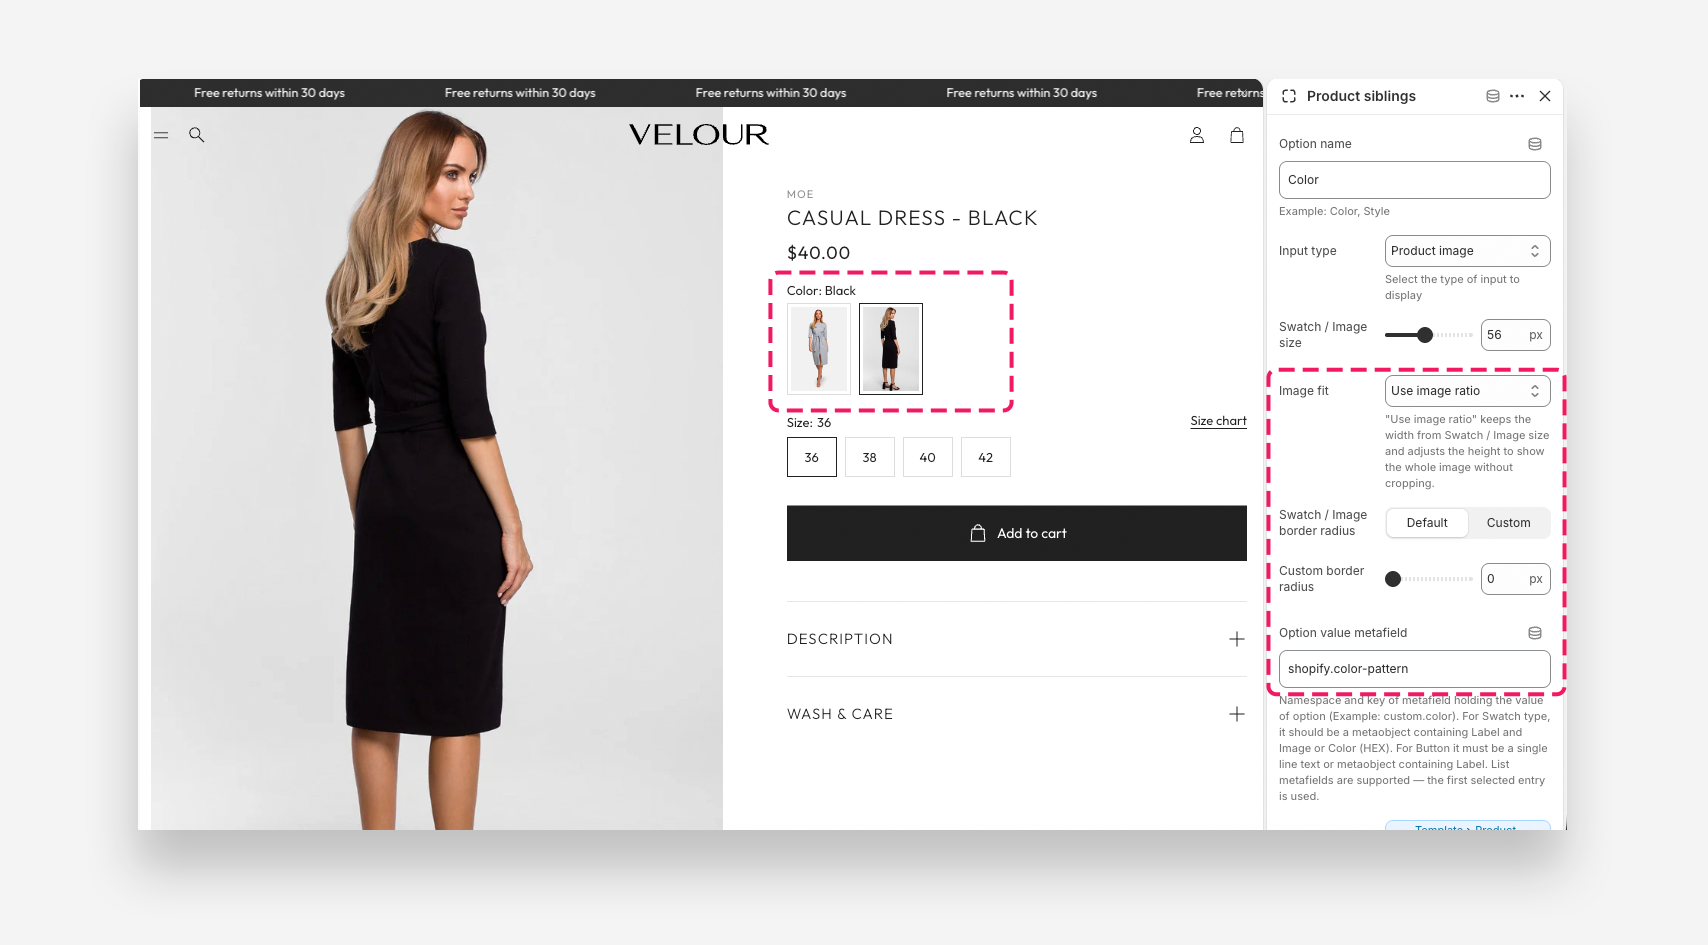
Method 1: Product Siblings with Product Images and a Metaobject List
This is the simplest method with the least configuration. It reuses the Color metaobject that Shopify already provides once you set a product's category — so there's no metaobject or custom color metafield to build from scratch. The swatch uses each product's existing featured image, and the option label comes from that metaobject list.
Use this method if you want the swatch to display each product's existing featured image, with the option label coming from a metaobject stored as a list — specifically the Color metaobject Shopify makes available after you assign the product to a category.
The theme uses the product's featured image as the visual and reads the label from the first metaobject in the list. You still need a Product Variations metafield to link the sibling products together.
Step 1: Set up the Metaobject "Color" (if not already present)
You have two options here — reuse Shopify's built-in Color metaobject, or create your own.
Option A — Reuse Shopify's default category Color metaobject (recommended)
Shopify provides a standard Color metaobject that is automatically available once a product is assigned to a category. For example, after you set a product's category to Dresses, Shopify shows a Color option (with a predefined list of color values and swatches) in the product's category-specific attributes. You can reuse this default metaobject instead of building one from scratch — just point the Color metafield in Step 2 at it.
Using the default Shopify Color metaobject saves setup time and keeps your color values consistent across products, since Shopify maintains the list of standard colors and their swatches for you.
Make sure the product is assigned to a category. If it isn't, select an existing one from the list.
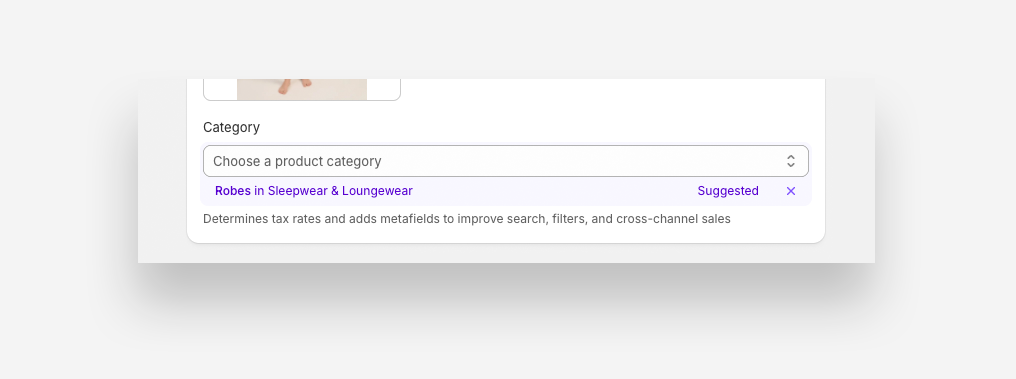
Then, if a Color suggestion appears among the category metafields, accept it — or select your own from the list that appears after clicking.
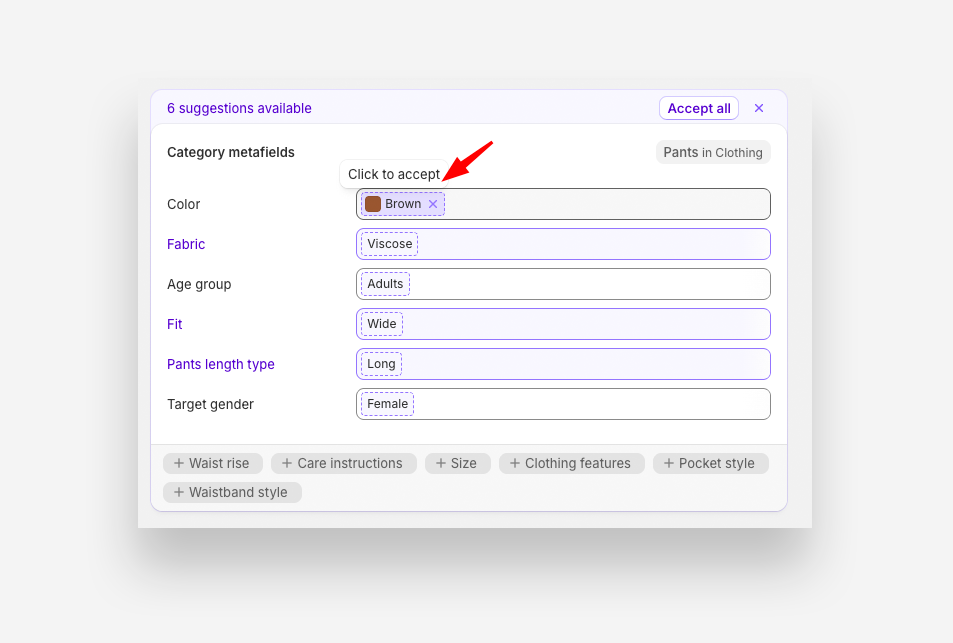
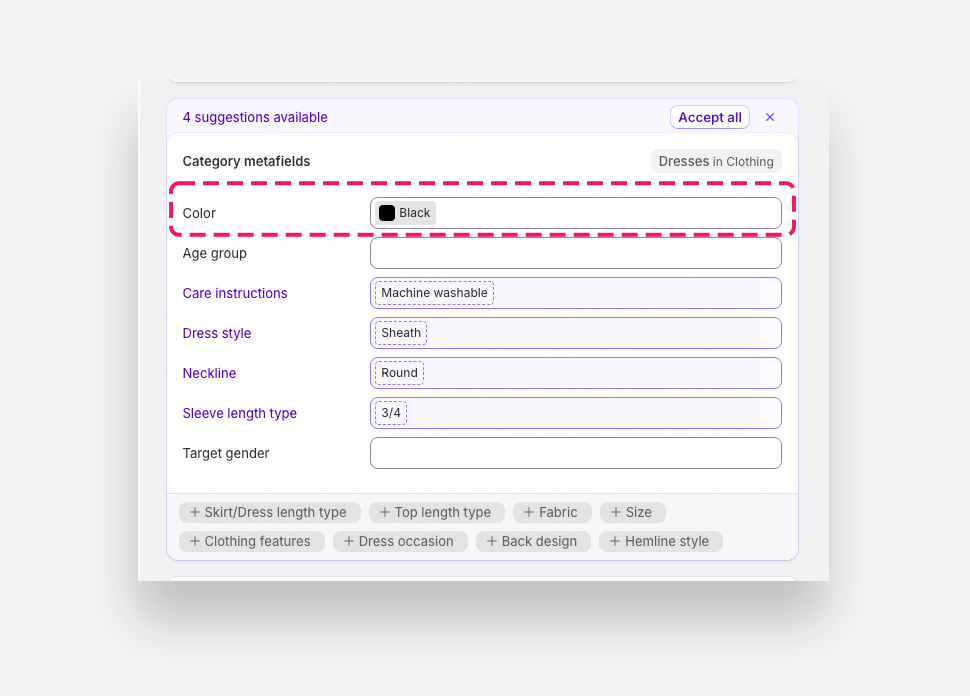
Sometimes the category assigned to a product won't have the metafield you need — for example, Color. If that happens, go to Settings → Metafields and metaobjects → Products, switch to Assigned to categories, and open that metafield. Then assign the metafield that you want to use to the proper category.
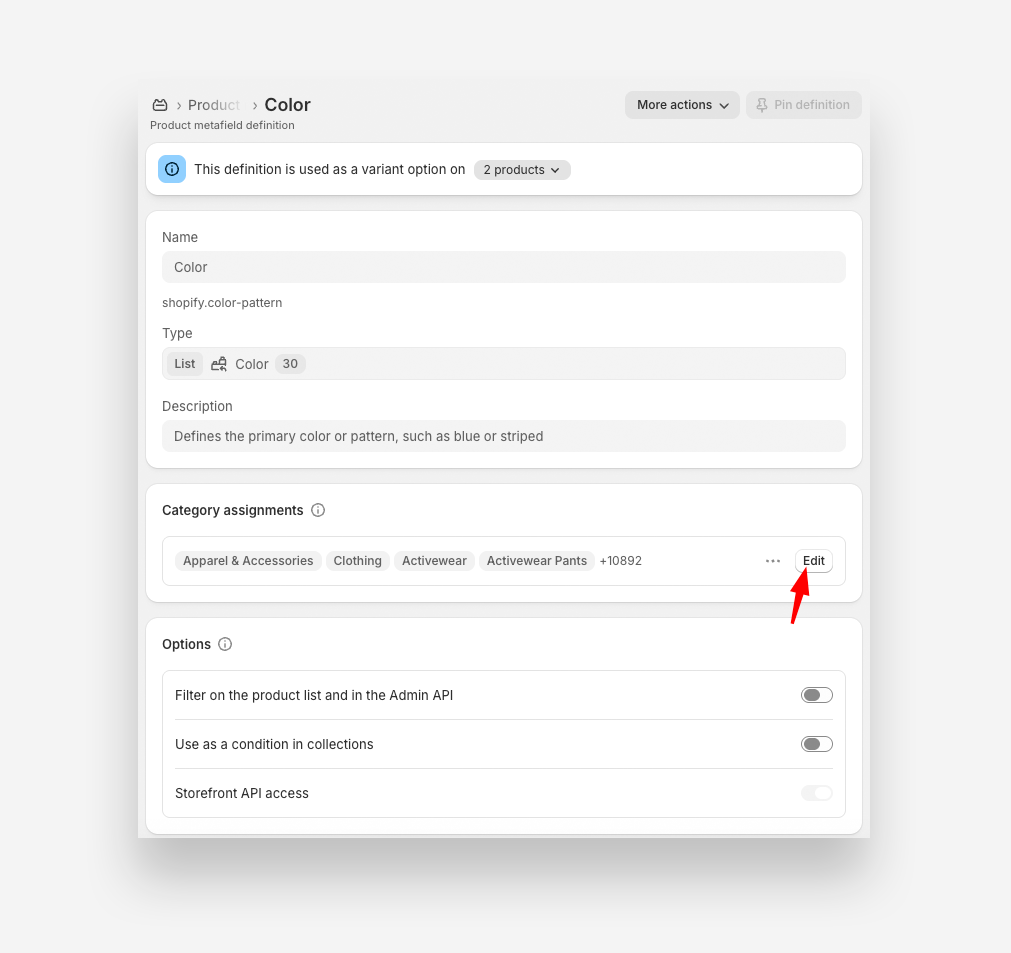
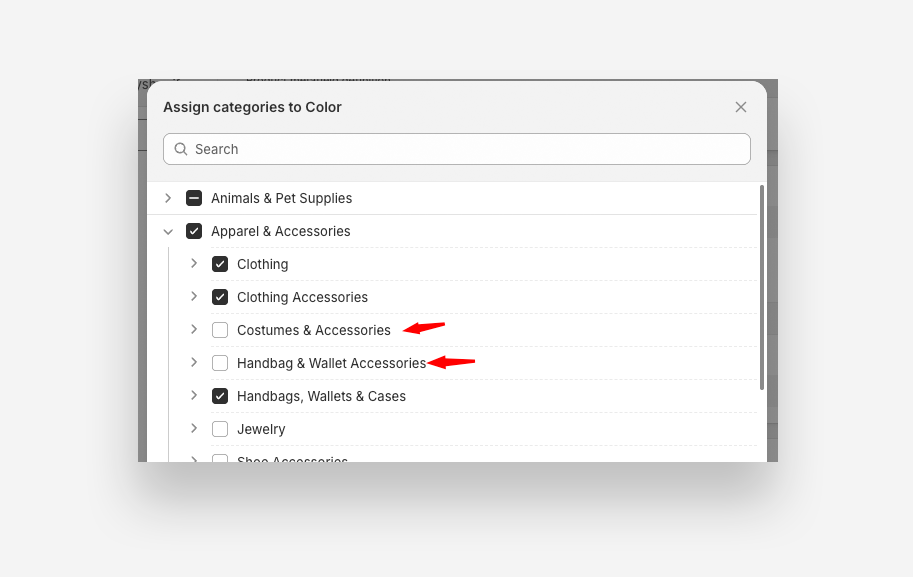
Option B — Create a custom Color metaobject
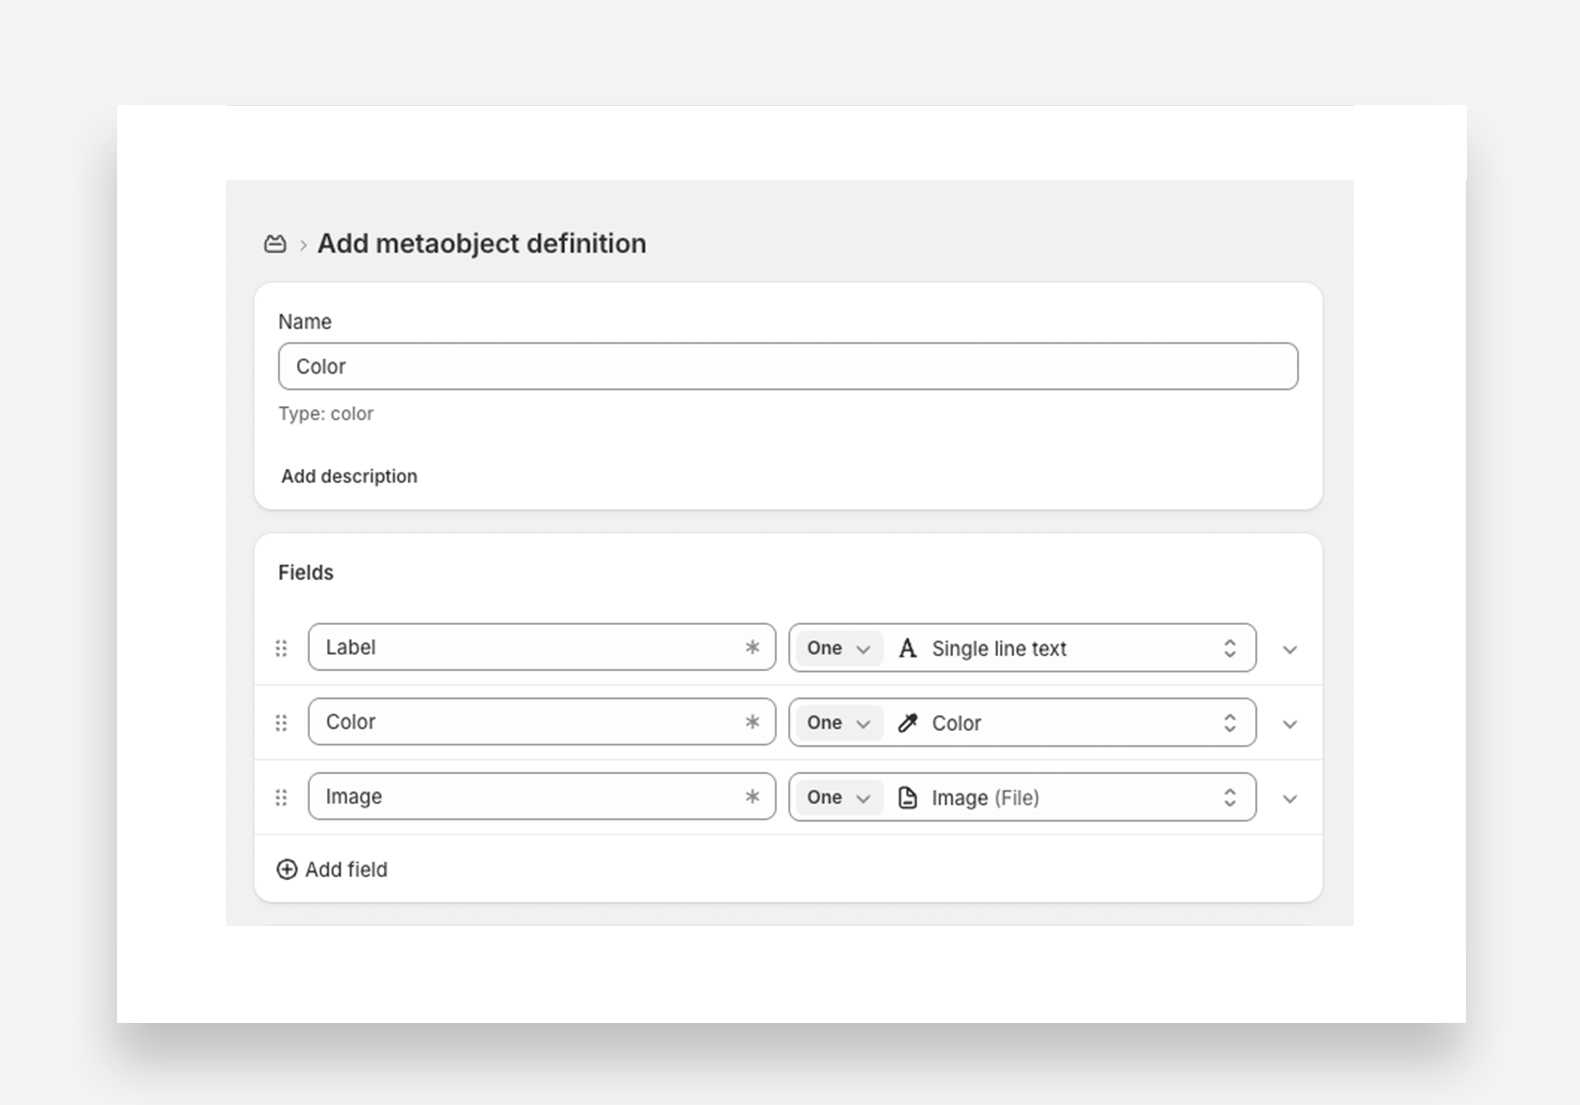
If you need custom colors or your own swatch images, create your own metaobject:
- In your Shopify admin, go to Settings > Content > Metaobjects.
- Click Add definition.
- In the Name field, type Color.
- Add fields like Label, Color, or Image.
- Click Save.
Step 2: Create a Product Metafield — Color (List)
This step is only required if you chose Option B (a custom Color metaobject) in Step 1. If you're reusing Shopify's default category Color metaobject (Option A), the metafield already exists on the product — skip ahead to Step 3.
To store the option value as a metaobject list, create a Color metafield of the list type.
- In the Shopify Admin, go to Settings → Metafields and metaobjects → Products.
- Click Add definition.
- Enter a name (e.g., Color) and set the Type to Metaobject.
- Select the Color metaobject from the list — either Shopify's default category Color metaobject (Option A above) or your custom one (Option B).
- Under Number of values, choose List of entries so the metafield stores a list of metaobjects.
- Click Save.
The block reads the first entry in the list to display the option label. Make sure the intended value is first.
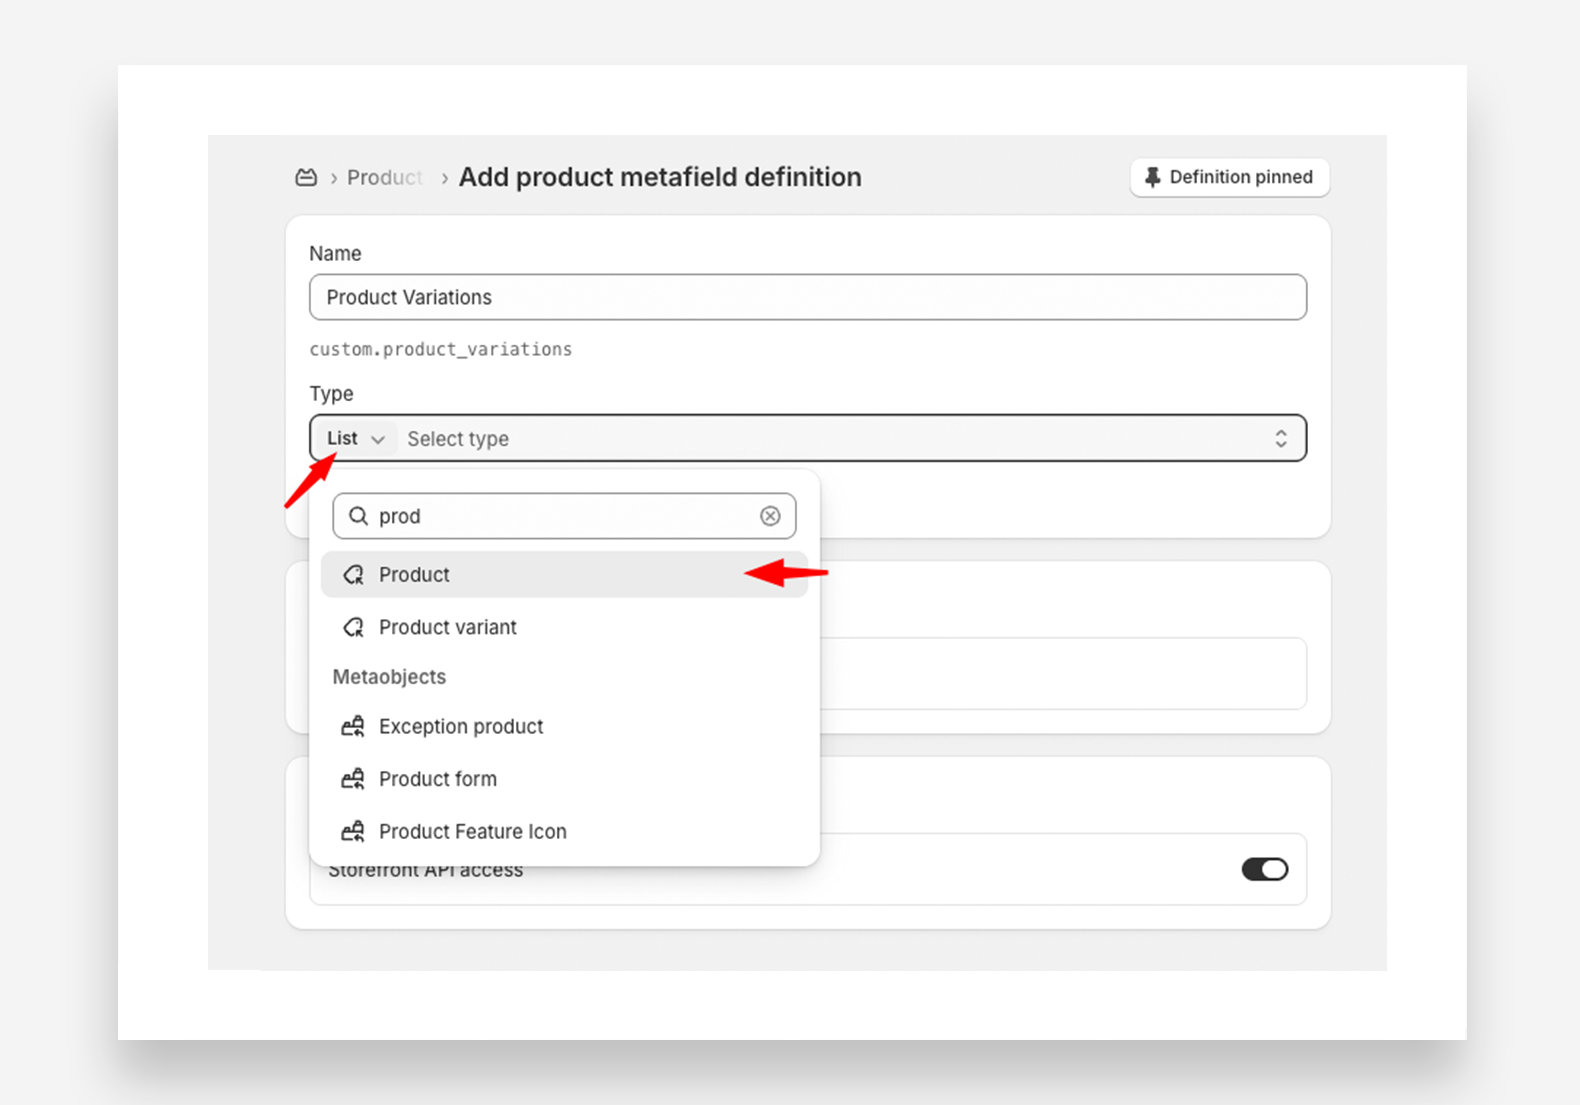
Step 3: Create a Product Variations Metafield
This metafield will store a list of related product siblings.
- In Settings → Metafields and metaobjects → Products, click Add definition.
- Enter a name (e.g., Product Variations).
- Select Product as the field type and choose List of products.
- Click Save.
Step 4: Assign Metafields to Products
Now apply the metafields to each product.
- Navigate to Products in the Shopify admin.
- Select the product that will have variations.
- Scroll to the Product Metafields section.
- Click the Color field and add one or more entries — the first entry is used as the label.
- Click Product Variations and add all related products (including the current product).
- Click Save.
The order of products in the Product Variations metafield reflects the order in which the swatches appear on the product page.
Repeat this step for every sibling product, keeping the product order consistent each time.
Connect Variations for Each Product
To ensure seamless linking between products, repeat Step 4 for every sibling product.
Step 5: Configure the Product Page
Now set up the Product Variations Block in your theme.
- Go to Online Store → Themes, then click Edit theme.
- Open the Product template.
- In the Product information section, add the Product siblings block.
- Set the Option Name (displayed above the swatches).
- Select the Input Type - Product image.
- Enter the namespace and key of the Color metafield (e.g.,
custom.color). You can find this in the Metafield Definition settings. If you're using the metafield that Shopify added automatically for the product category (Option A), the namespace and key will follow Shopify's convention — for example,shopify.color-pattern. - Click the Dynamic Source icon and select the Product Variations metafield as the product list.
- Click Save.
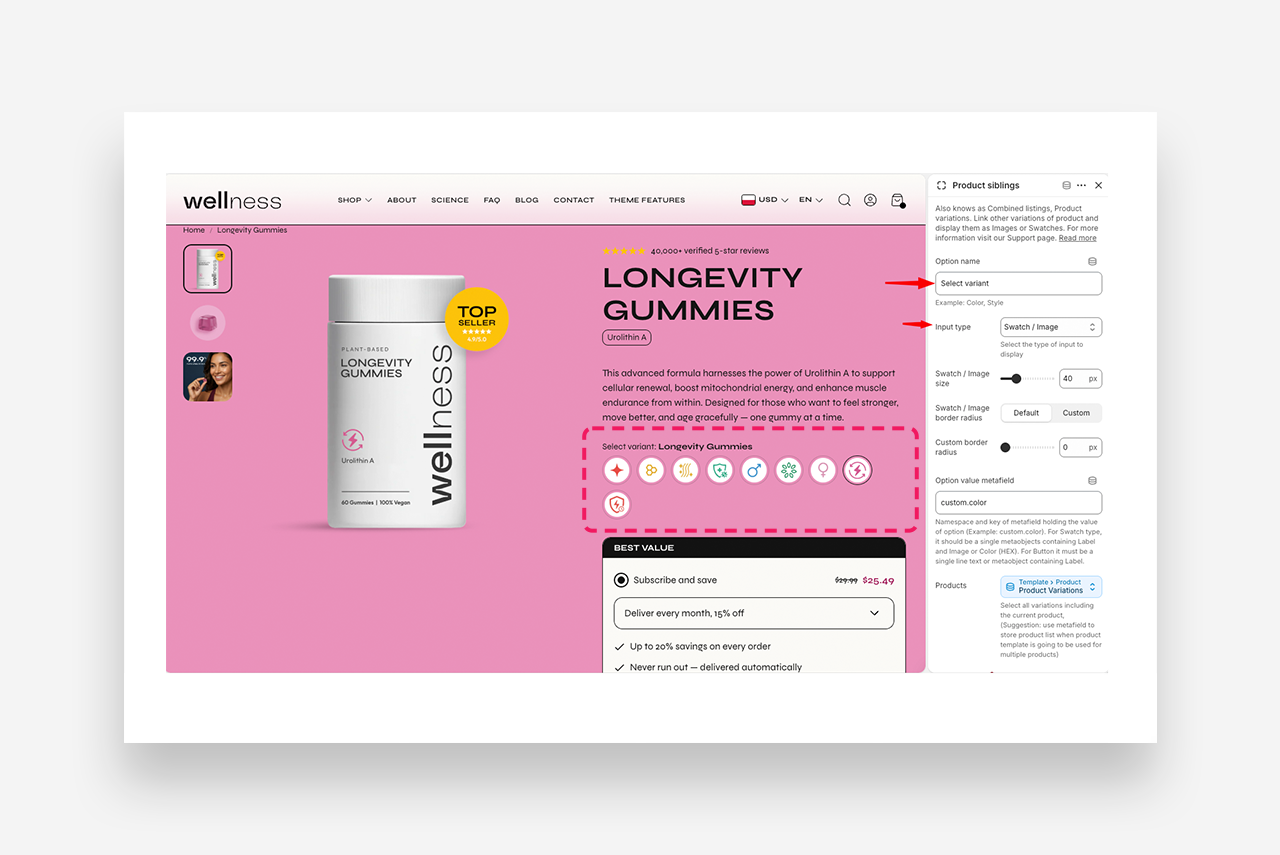
Method 2: Product Siblings with Custom Metafield Images
Use this method if you want full control over the swatch visuals — for example, showing a specific color swatch or a cropped image that differs from the product's main photo.
Step 1: Set up the Metaobject "Color" (if not already present)
- In your Shopify admin, go to Settings > Content > Metaobjects.
- Click Add definition.
- In the Name field, type Color.
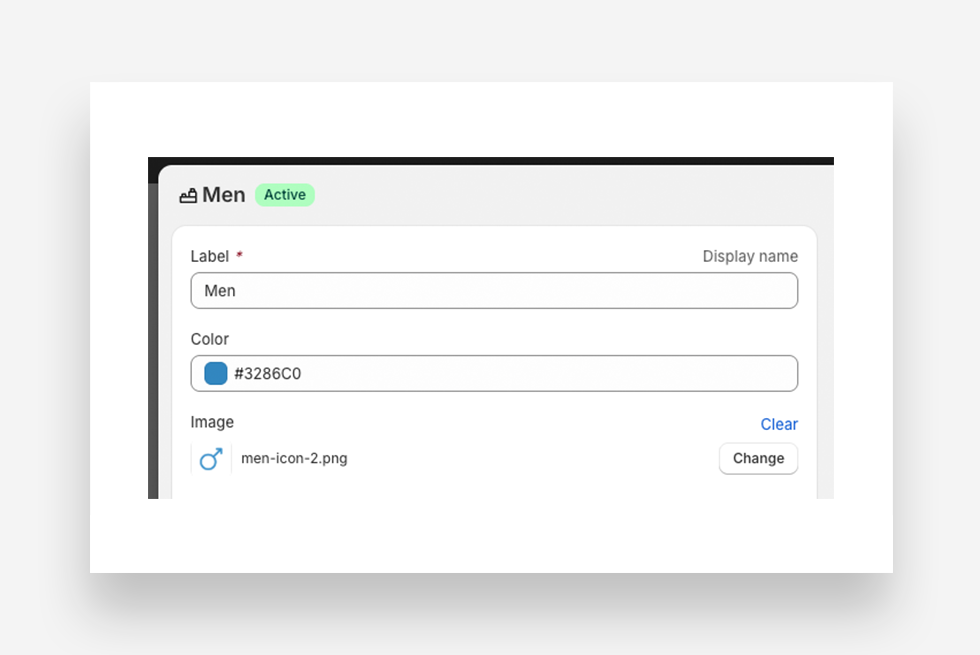
- Add fields like Label, Color, or Image.
- Click Save.
Step 2: Create a Product Metafield — Color
To store color values or images for product variations, create a Color metafield.
- In the Shopify Admin, go to Settings → Metafields and metaobjects → Products.
- Click Add definition.
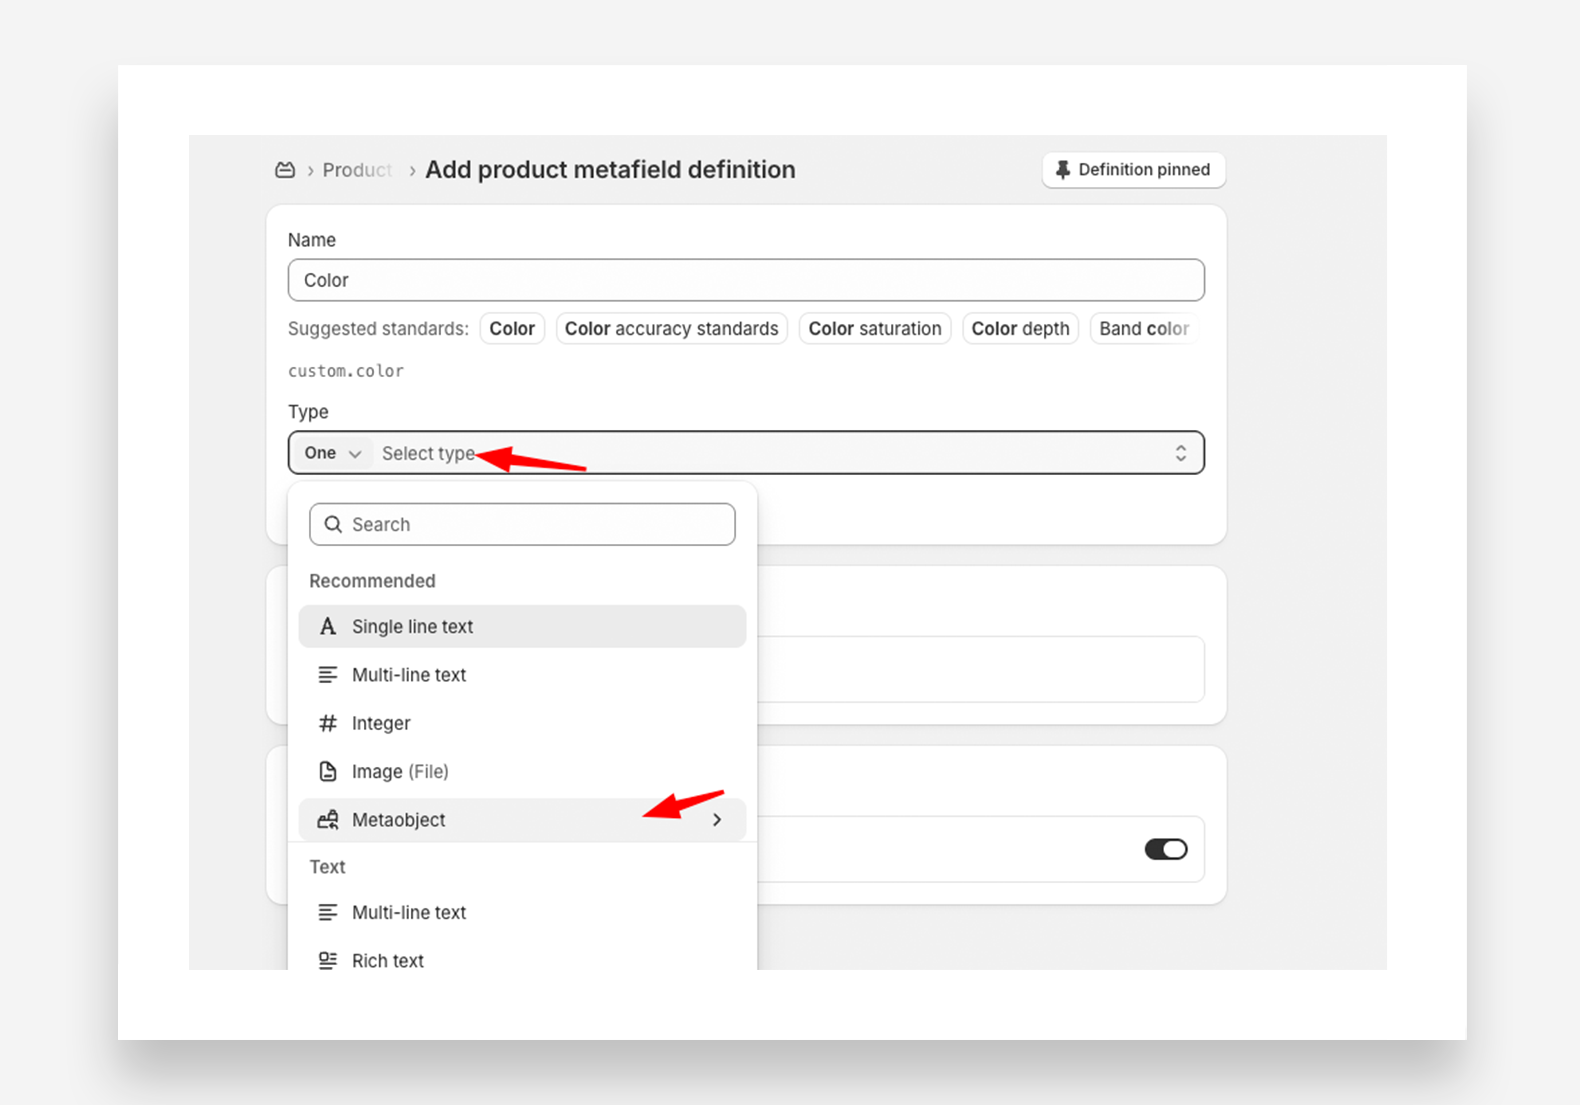
- Enter a name (e.g., Color) and set the Type to Metaobject.
- Select the Color metaobject from the list.
- Click Save.
Step 3: Create a Product Variations Metafield
This metafield will store a list of related product siblings.
- In Settings → Metafields and metaobjects → Products, click Add definition.
- Enter a name (e.g., Product Variations).
- Select Product as the field type and choose List of products.
- Click Save.
Step 4: Assign Metafields to Products
Now apply the metafields to each product.
- Navigate to Products in the Shopify admin.
- Select the product that will have variations.
- Scroll to the Product Metafields section.
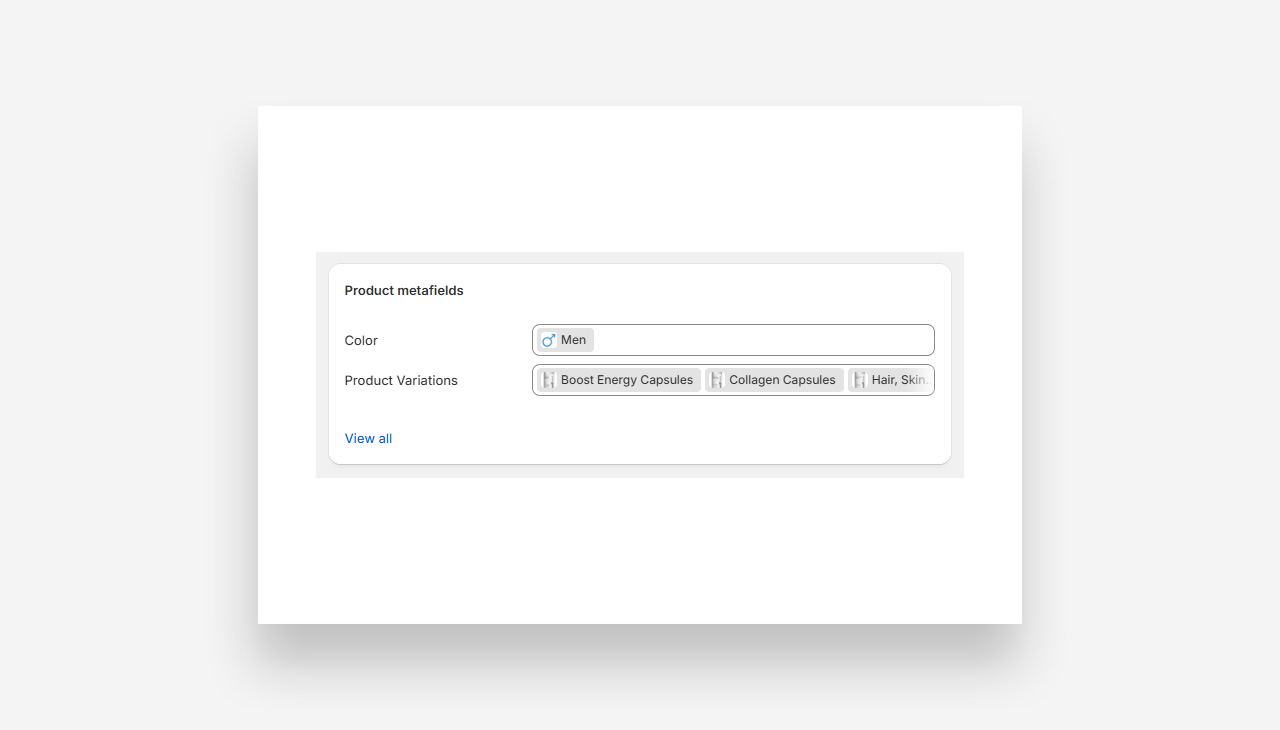
- Click the Color field and assign the appropriate color or image.
- Click Product Variations and add all related products (including the current product).
- Click Save.
The order of products in the Product Variations metafield reflects the order in which the swatches appear on the product page.
Repeat this step for every sibling product, keeping the product order consistent each time.
Connect Variations for Each Product
To ensure seamless linking between products, repeat Step 4 for every sibling product.
Step 5: Configure the Product Page
Now set up the Product Variations Block in your theme.
- Go to Online Store → Themes, then click Edit theme.
- Open the Product template.
- In the Product information section, add the Product siblings block.
- Set the Option Name (displayed above the swatches).
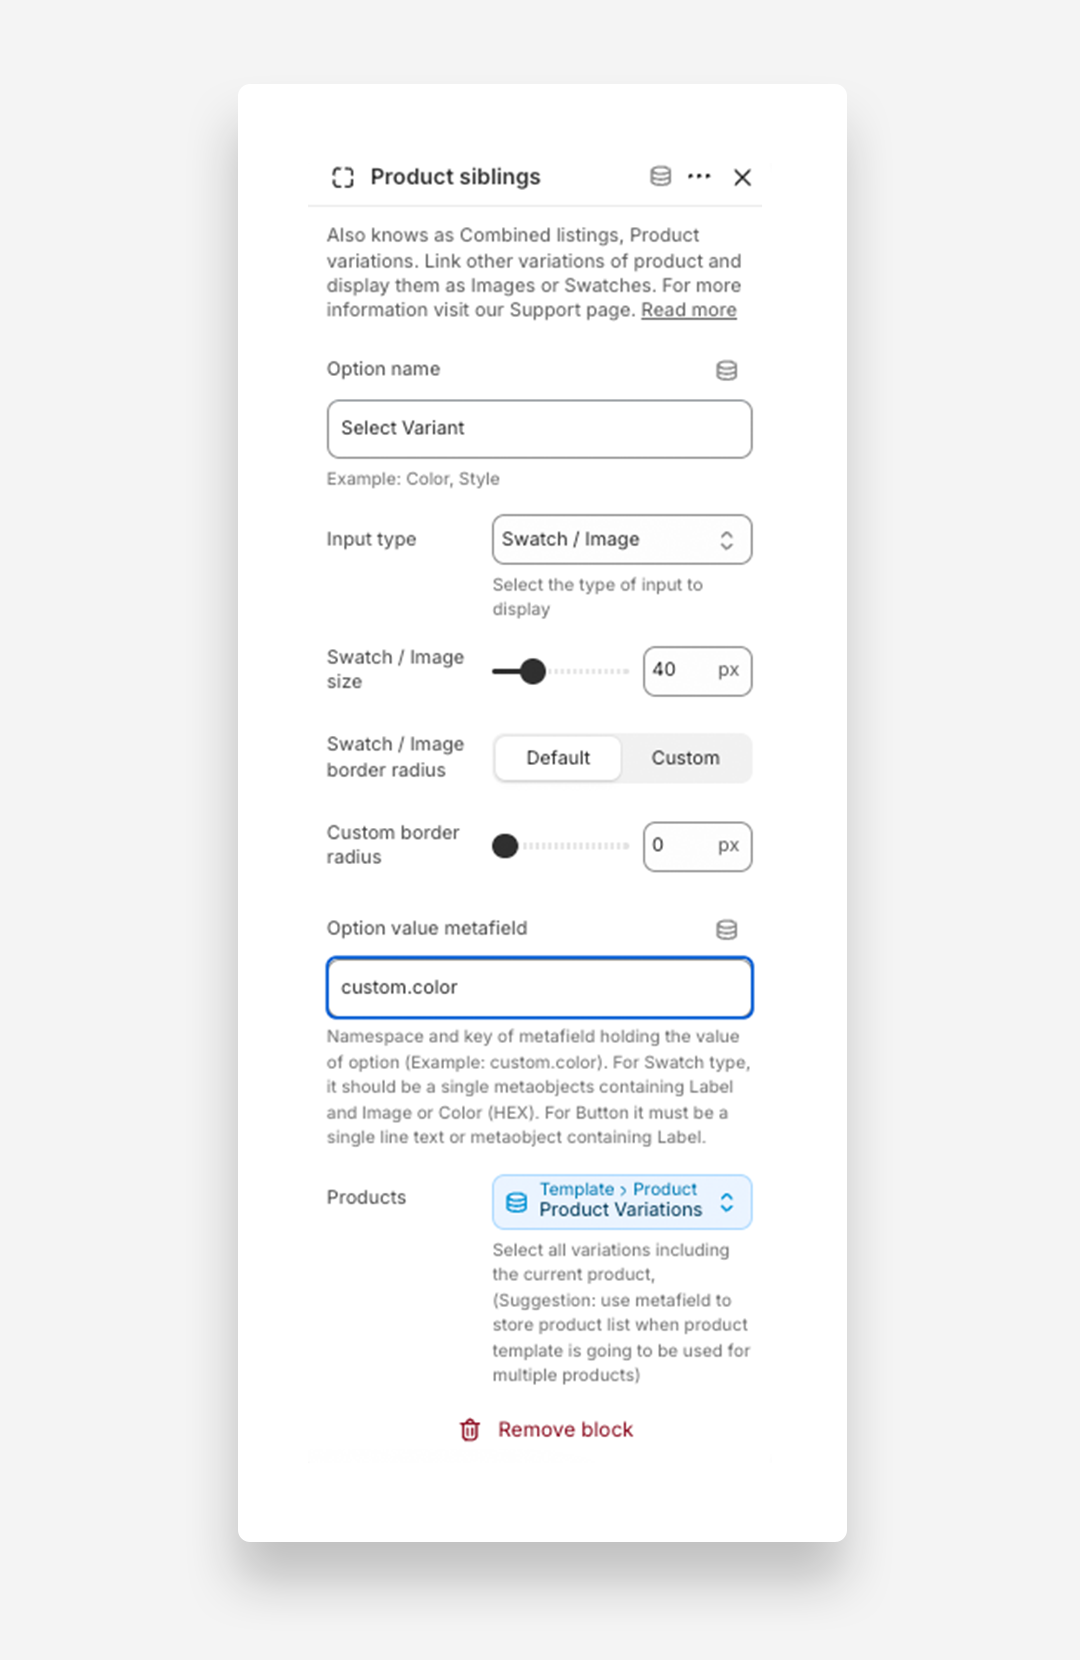
- Select the Input Type - Swatch/Images or Button.
- Enter the namespace and key of the Color metafield (e.g.,
custom.color). You can find this in the Metafield Definition settings. - Click the Dynamic Source icon and select the Product Variations metafield as the product list.
- Click Save.
How to configure the Product Page to set up the Product Siblings block using swatches (metaobject) →
Method 3: Product Siblings with Product Images
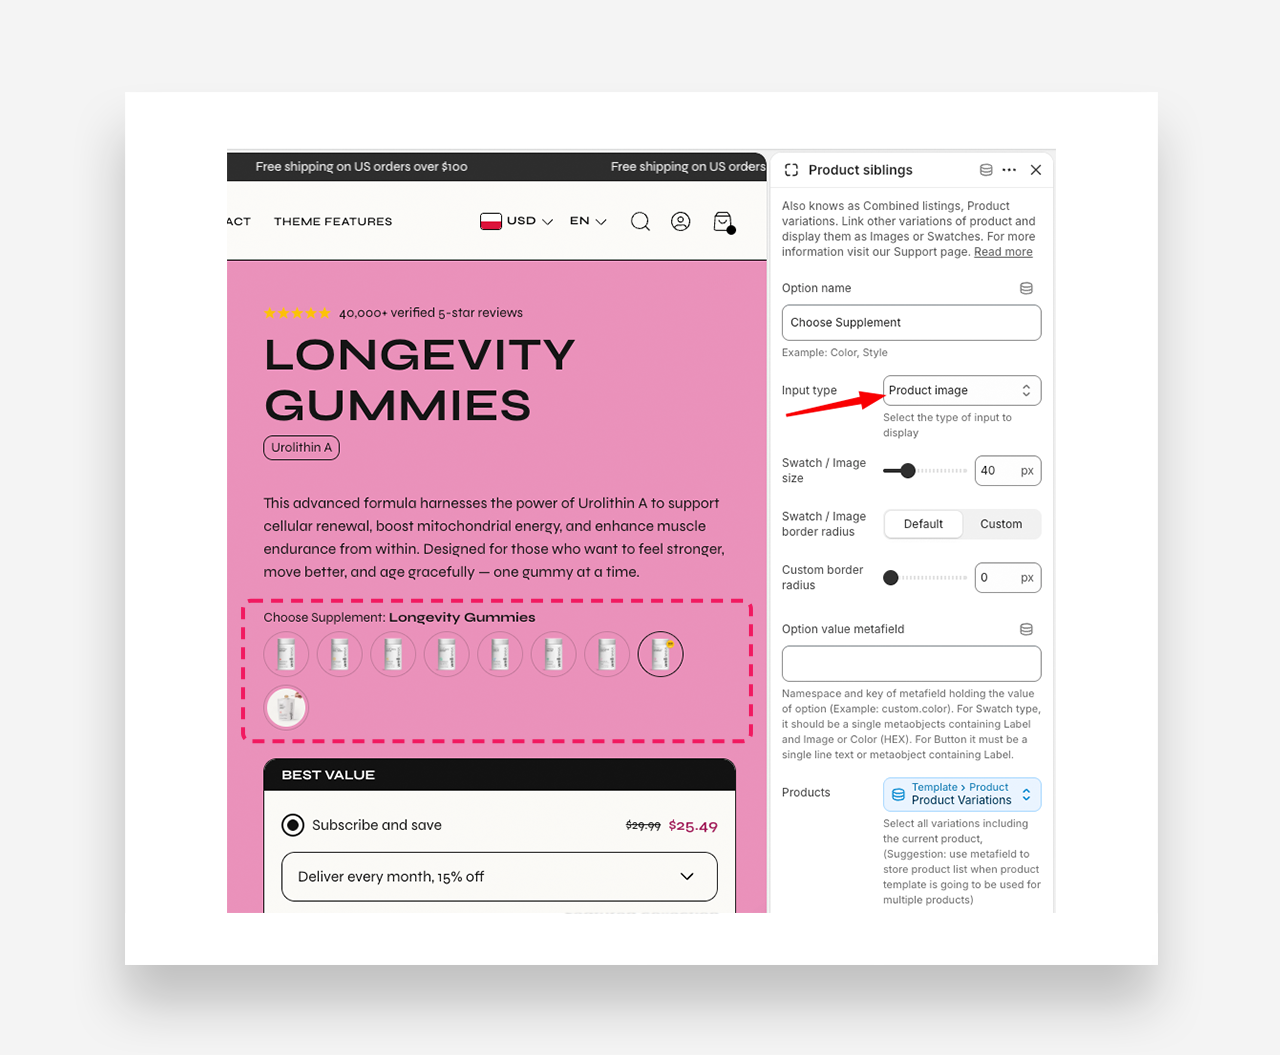
Use this method if you want the swatch to display each product's existing featured image — no Metaobject or Color metafield required.
Instead of a custom color swatch, each sibling product's featured image is used as the visual indicator. A Label metafield is used to display a text label for the currently selected option. You still need a Product Variations metafield to link the sibling products together.
Step 1: Create a Product Metafield — Label
To display a custom label for selected option.
- In the Shopify Admin, go to Settings → Metafields and metaobjects → Products.
- Click Add definition.
- Enter a name (e.g., Label) and set the Type to Single line text.
- Click Save.
Step 2: Create a Product Variations Metafield
This metafield will store a list of related product siblings.
- In Settings → Metafields and metaobjects → Products, click Add definition.
- Enter a name (e.g., Product Variations).
- Select Product as the field type and choose List of products.
- Click Save.
Step 3: Assign Metafields to Products
Now apply the metafields to each product.
- Navigate to Products in the Shopify admin.
- Select the product that will have variations.
- Scroll to the Product Metafields section.
- Click the Label and complete it.
- Click Product Variations and add all related products (including the current product).
- Click Save.
The order of products in the Product Variations metafield reflects the order in which the swatches appear on the product page.
Repeat this step for every sibling product, keeping the product order consistent each time.
Connect Variations for Each Product
To ensure seamless linking between products, repeat Step 3 for every sibling product.
Step 4: Configure the Product Page
Now set up the Product Variations Block in your theme.
- Go to Online Store → Themes, then click Edit theme.
- Open the Product template.
- In the Product information section, add the Product siblings block.
- Set the Option Name (displayed above the swatches).
- Select the Input Type - Product image.
- Enter the namespace and key of the Label metafield (e.g.,
custom.label). You can find this in the Metafield Definition settings. - Click the Dynamic Source icon and select the Product Variations metafield as the product list.
- Click Save.